Art advice
How to hang your artwork
Make hanging art an easy aspect of your collecting journey by gaining expert tips of where, when and how to hang your new artwork.

Sarah Lyons
Tuesday 10 October, 2023

So, you’ve invested in a beautiful piece of contemporary art at one of our fairs, and then what? Whilst hanging artwork can be easy once you’ve had a little practice, for many of us the process can seem a bit daunting. This means that newly bought pieces often end up gathering dust, or hung in a way that does little to justify the beauty of the artwork. Poorly spaced frames, small artworks in large spaces, wonky canvases — these are just a few of the common errors which we can help you solve with a little prior planning.
To help you avoid these potential pitfalls, we’ve created a handy ‘how-to’ guide, solving the most common mistakes and giving some practical and technical advice to ensure that your artwork looks absolutely stunning in its new home. All it takes is the right toolkit, an extra pair of hands and a little self-confidence — and you’ll be a picture-hanging pro in no time.
STEP 1: WHERE TO HANG?
The right space
First up: where is your artwork going to live? We often buy a painting, print or wall hanging with a particular space in mind. Perhaps with the hope that adding a piece of art will change how the room feels. Other times, we just had to have the artwork in our home and don’t have an exact plan in mind. If this is the case, take your time deciding what area of your home will suit your work best.
Before making a decision, there are some practical considerations; make sure you’re putting your precious piece in a place it can thrive. Placing a canvas or unframed piece in a damp environment like a bathroom might cause it to wrinkle, and likewise hanging a work in direct sunlight could make it fade. Take care around radiators or open fireplaces too — it might be damaged by the heat if too close.
Finding a balance
Once you’ve worked out which room you’re going to hang in, you need to consider the specifics: precisely where on the wall will work best. Whilst this may sound simple, it’s worth thinking through beforehand. One of the most common mistakes when hanging art work is that people tend to hang too high — so we’re going to get a little technical here and explain how to avoid this.
When walking into a room, art hung too high or too low can really alter its feeling: too high means that the work appears to be floating, seeming disconnected from the interior. On the other hand, work hung too low can make it feels as if the surrounding walls are closing in. The answer to this conundrum is to ensure your artwork is hung at eye level. To do so, we recommend following advice given from the professionals: when hanging work, the centre of the artwork should be about 57 inches from the floor, or 8 inches above a piece of furniture. This will give the artwork room to breathe, whilst making sure it’s still integrated into the room as a whole. Time to get the tape measure out!
If this seems little too specific for you — and granted, everyone’s eye-level is different — another tip is to visually divide your wall into four. Ideally, your work should be placed in the third section when counting up from the floor.

STEP 2: HOW TO HANG?
Once you know where you want your piece to live, you now have the task of actually hanging it. Crucial to this step is ensuring the work is hung securely. The last thing you want is your perfect piece to fall off the wall just as you’re congratulating yourself on how great it looks in the space.
Back to basics: The Toolkit
It’s really important to make sure you have the right tools. You’ll need a tape measure, pencil, hammer, a range of hooks and nails and a friend to help.
X-marks the spot
Once you’ve used your tape measure to roughly work out where the centre of your artwork should sit on the wall — as described in Step 1 — lightly mark it with a pencil. To double check that you have marked the perfect spot, we suggest recruiting a friend to hold the work in place on the wall and let you stand back and check it from across the room.
When you are happy, while your friend holds the picture in place, place a small mark on the wall at the top of the frame.
Now you have two marks – the centre point and the top of the frame. On the back of your artwork, the wire or D-ring that will be used to attach the artwork to the hook will likely sit in-between these two points. Next, measure the distance between the top of the frame down to the wire or D-ring (if it’s a wire remember to hold it taut as the weight of the artwork pull it down).
Returning to the wall, measure down from the point that marks the top of the frame and voilà — you have the exact spot where your hook should be fixed to the wall.
Weighing things up
Now, you need to securely attach your work onto the wall. If your painting or print isn’t too heavy, opt for picture-hanging hooks, which are surprisingly secure. You can get varying hooks of different sizes, so if your work is on the larger side, go for a larger hook with multiple nails to hold it in place. If the piece is seriously heavy, you may need to use a drill, raw plug and screw to attach a sturdy hook on the wall.
If your artwork already has a suitable wire or D-ring on the back, great! If not, to make sure that your piece is secure we suggest having a chat with a framer, particularly if your artwork is on the larger side or is an irregular shape. It’s no surprise that framers can offer expert advice on best practice. It’s worth bearing in mind that investing in proper framing can make a huge difference in protecting both your work and the wall, and a framer can advise on the best wire or D-ring for your piece, depending on its weight.
Happy artwork hanging!
By following our guide, you can rest easy in the knowledge that your artwork not only looks great, but is securely fastened and won’t run the risk of damaging the wall. You have invested in a beautiful work of art, so it’s well worth investing some extra time to make sure it’s happily situated and hung correctly. Then you can just hang out and enjoy the view!
Feeling inspired? Check out our upcoming fairs and block out your diary!
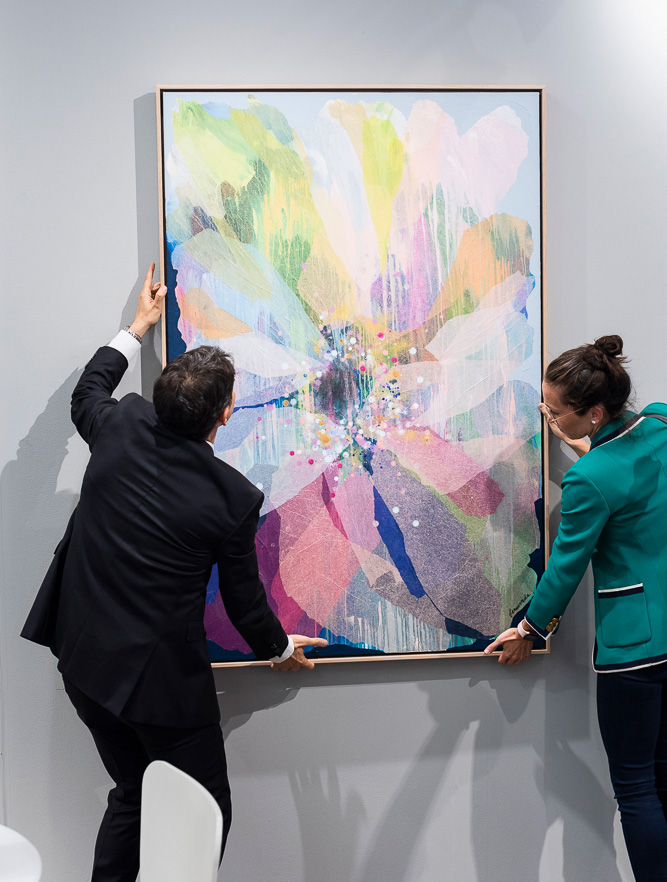
Main Image: Gallerists carefully hanging some beautiful artwork at Affordable Art Fair Hong Kong, 2023.